Saturday, October 25, 2014

Southwest Chicken Soup (More like a stew!)

My favorite diner - Red Geranium - used to have a cook that made this killer soup. I tried to recreate it and got close enough to cure any cravings I have for it. It's an amazingly filling soup, great on cold winter days, just spicy enough and so thick it's more like a stew than soup.

I made a mistake with the first version by overestimating the rice needed, but the flavor was nearly spot on. The first taste test was right on spice wise, but having to add more water or chicken broth when re-heated cut the flavor a bit. Adding more chili powder helped kick it back up.

It's a quick and easy recipe, make it in a crockpot and let it go all day or throw it together using some handy leftovers and it'll be ready in no time.  I'm including cooking instructions for both methods here, but will give you just one list of the ingredients.

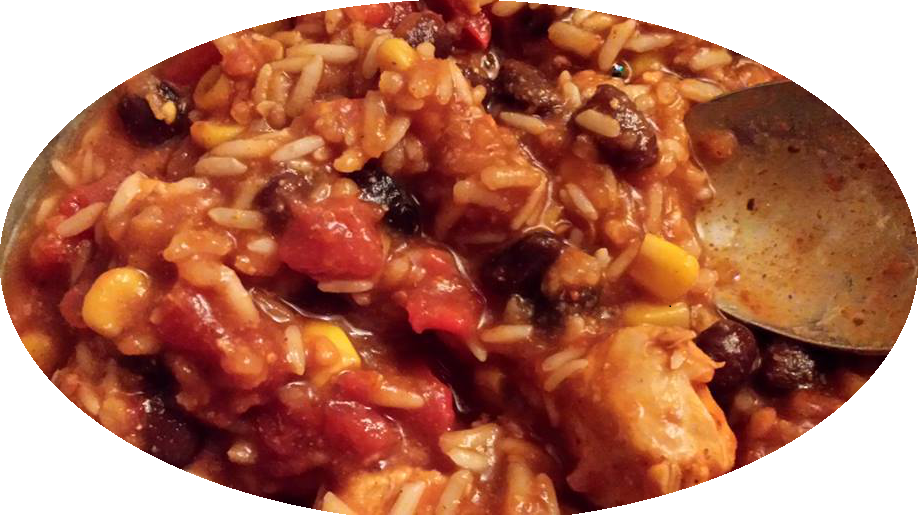
To whet your appetite, here's a sneak peak of the yumminess waiting for you after it's cooked up.

Groceries Needed

Here's the list of what you'll need:

  • 1 1/2 to 2 lbs. chicken - use fresh skinless chicken breasts for crock-pot version, rotisserie chicken will work for stockpot version
  • 2 cans (15 oz. each) tomato sauce
  • 2 cans (14.5-15 oz. each) diced tomatoes OR 30 oz. diced fresh tomatoes
  • 2 cans (15 oz. each) black beans, rinsed
  • 1 pkg. frozen SouthWest Corn (corn with onions, red peppers, green peppers) 
  • 1 pkg. (1.25 oz.) McCormick Taco Seasoning (low sodium works great if salt is a concern)
  • 1 cup rice - white or brown - uncooked (for stockpot version pre-cooked or leftover rice is needed)
  • 1 can  (14.5 oz.) chicken broth
The mistake I made in the crock-pot was putting in 2 cups of rice without enough liquid, and really 2 cups of rice was too much. I've adjusted the recipe accordingly. If you're doing the stockpot version, then for the rice you'll want either unseasoned/un-buttered rice or cook the rice while everything else is warming in the stockpot.

Crockpot Instructions

This recipe will require a 5-quart crock-pot. I strongly suggest NOT using a liner. Instead spray the inside of the crock with olive oil to prevent sticking. Do NOT use vegetable oil, it makes the soup taste funny. If you're good about stirring every few hours, you can get away without spraying the crock.

Here's how I put this soup together. I'm including the step-by-step instructions for the kids I borrow, that way they'll have this available when they go off to college and won't have to call me.

  1. Open both cans of tomato sauce and pour into the pot first. 
  2. Open the taco seasoning and dump into the pot. Stir this in fairly well.
  3. Cut the fresh chicken into roughly 1" chunks and add to the pot.
  4. Open both cans of diced tomaoes and add to the pot.
  5. Open both cans of black beans. Drain and rinse the beans before adding to the pot.
  6. Add the frozen corn to the pot.
  7. Turn on the crock-pot to cook for 8 hours on low heat. 
  8. After 6 hours add in the rice and the chicken broth. Stir in well, don't forget to "pull up" the heavier ingredients from the bottom of the pot too as this will help ensure the rice soaks up some of the spicy flavor.
  9. When the crock pot is done cooking, leave it on warm (mine does it automatically). Serve straight from the pot or place it all in a fancy serving bowl. Using a ladle helps make sure you're getting some chicken from the bottom of the pot into the bowl.
  10. Eat. Enjoy. Repeat.
Note on the rice: if you don't want the rice to soak up everything, then pre-cook a cup of rice and add it about 1 hour before the crock-pot is finished cooking. Skip adding the chicken broth to the soup as it shouldn't be noted. If you soup is too thick due to the rice it can be fixed by adding some water or chicken broth when re-heating.


Preferred Brands

In the interest of full disclosure I get nothing from any company, but want to share what brands I use for the ingredients. For the beans I used Ortega and Bush brands. For the tomato sauce and tomatoes I use Hunts. For the chicken I used Tyson; I prefer Perdue or Amish raised but those weren't available. I used long-grain white California rice, and Swanson's Chicken Broth.

This is the crock-pot model I have. I got it on sale cheap at Meijer and absolutely LOVE it! Really though, any crock-pot will work.


Stockpot Instructions

 If you don't have a stockpot, you'll be ok. All you really need is a 5 quart pot of some kind. I use the one that came with my KitchenAid (again, purchased on sale for cheap) anodized non-stick cooking set. I'm stuck with an older electric stove with a glass top that's incredibly picky and tends to warp aluminum cooksets.

Total cook time will depend on what ingredients are already cooked and ready to go, and the thickness of your pot. You'll want it to be nice and hot, which on my stove with already cooked chicken and rice works out to about 20 minutes on medium-high heat.
  1. Open both cans of tomato sauce and pour into the pot first. 
  2. Open the taco seasoning and dump into the pot. Stir this in fairly well.
  3. Cut the cooked chicken into roughly 1" chunks and add to the pot. If you're using leftover rotisserie chicken (lemon herb adds a great flavor to the soup) shredding it will work just fine. If you're using canned chicken chunks, drain it well first.
  4. Open both cans of diced tomaoes and add to the pot.
  5. Turn the burner on low to start the cooking process.
  6. Open both cans of black beans. Drain and rinse the beans before adding to the pot.
  7. Add the frozen corn to the pot. Stir again.
  8. Turn the heat up to medium.
  9. Add in the rice and chicken broth and stir well.
  10. Keep stirring every few minutes until the soup is lightly boiling.
  11. Serve straight from the pot or place it all in a fancy serving bowl. Using a ladle helps make sure you're getting some chicken from the bottom of the pot into the bowl.
  12. Eat. Enjoy. Repeat.
Note on the rice: If you're short on time and rice, use 5-minute rice and chicken broth instead of water. Add in the rice as soon as it's done.

To spice up either version, add in some more chili powder, or hot sauce.

Hope you enjoy it!


Wednesday, October 1, 2014

Check Yourself!

As the beginning of October is upon us, I've had too many stark reminders that October is Breast Cancer Awareness month.  Please check yourself, every month, and every year if you're of "that age" to get mammograms - this includes you men as well!

Don't be afraid to demand tests, don't hesitate to demand tests.

There are no tests yet for Pancreatic Cancer, but it has hit the mainstream with Steve Jobs death and hit home with my sister's diagnosis. The symptoms mimic many other illnesses, but if you are having unusual nausea or your skin is getting uncharacteristically itchy keep demanding testing. If your doctor won't listen find another.

Know your normal, trust your gut, and never be afraid to be your own best advocate.

Wednesday, September 10, 2014

Cookbook is now available in Full Color and Black & White

The full color paperback version on CreateSpace is about $10 more than  what a black-and-white version (meaning the pictures are in black and white as well as all the text, cover is still in color) would cost. So I added a new black and white version; the book is now available on Kindle, and at Amazon in paperback format.

I'm working on getting it on to Lulu and Barnes and Noble but need to get through all the legalize first.  In the meantime, Kylee agreed to get a picture of my scones and my Devilishly Chocolate bundt cake, and the cake picture came out so nice I had to share.

Doesn't this look yummy?


If you'd like to order a special spiral bound copy, you can do  so at the Pyrhaven Etsy shop, please let me know if you would like it signed. I'm surprised at how many people have asked for it to be signed, it's very humbling.

The paperbacks can be found on Amazon by searching on the title, so you can order from the correct country site. (The links I have are for USA only.)

Monday, February 24, 2014

Coobook is Done!

Finally, after a year of measuring, baking, and having taste testers giving thumbs up/downs on the recipes the cookbook is done. Merry Mary's Marvelous Munchies is now available for Kindle, and will be available on Amazon as a paperback shortly.

Two special editions were donated, along with tote bags and fun aprons to The Network Gala 2014 to help raise funds for Save A Life. The aprons were a big hit and more will be listed on the Etsy shop by next week. Custom orders are more than welcome!

The year began the same way that last year ended, with more loses to the family. From November thru January we lost my sister, and both my mother-in-law and father-in-law. The shop has been sorely neglected by the demands of sick family members and the cookbook. I will be ramping it up again over the next few months. Adding a few new vintage items and some sewing machine parts as I gut one machine to rebuild another.

If you're looking for a vintage sewing machine of a particular make/model and would like some help finding one, shoot me an email. I'll be happy to try to help and will let you know if I have one on hand. With 17 in the house, it's time to let some go anyway.

Tuesday, October 1, 2013

Check Yourself!

As the beginning of October is upon us, I've had too many stark reminders that October is Breast Cancer Awareness month.  Please check yourself, every month, and every year if you're of "that age" to get mammograms - this includes you men as well!

Don't be afraid to demand tests, don't hesitate to demand tests.

There are no tests yet for Pancreatic Cancer, but it has hit the mainstream with Steve Jobs death and hit home with my sister's diagnosis. The symptoms mimic many other illnesses, but if you are having unusual nausea or your skin is getting uncharacteristically itchy keep demanding testing. If your doctor won't listen find another.

Know your normal, trust your gut, and never be afraid to be your own best advocate.

Saturday, September 14, 2013

Brownie Cookie Perfected!

It's taken me longer than expected, but I finally got the recipe down. These turned out nice and chewy once completely cooled and are very close to my all-time favorite one that I used to get in high school. They're not exactly alike though as I refuse to use corn syrup in my recipes whenever I can avoid it.

So here's the basic recipe and if you're a corn syrup fan, you can take out 2 tablespoons of the sugar in exchange for 2 tablespoons of light corn syrup to get a moister, chewy brownie cookie.


First whisk together (or use a mixer) the following:

  • 2 cups sugar
  • 3/4 cup butter (melted) or you could substitute for shortening, but then why bother?
  • 2 teaspsoons vanilla extract
  • 1/4 teaspoon salt  (optional)
  • 1/4 teaspoon instant coffee/espresso (optional)

Put the mixer on slow and add the following:

  • 3/4 cup cocoa powder (regular or dark cocoa) - add this 1/4 cup at a time
  • 2 eggs - extra large or jumbo size

When the eggs are just blended turn off the mixer and stir in the dry ingredients by hand:

  • 1 teaspoon baking soda (if you like "cakier" brownies use baking powder)
  • 2 1/3 cups flour

The dough will be thick. You can either spoon them onto a parchment lined cookie sheet (non-stick may work too), or do what I do which is roll them into a ball, much like Snickerdoodles.  For a thinner cookie, use wax paper and the bottom of a glass to flatten them out, otherwise they spread fine and end up about as thick as my Snickerdoodles.

Bake at 350 degrees Farenheit for 8 minutes (undercooked is ok) and leave them on the still hot cookie sheet for at least 4 minutes, then move to a wire rack to cook.  These are at their chewiest after they are completely cooled.

Feel free to add in whatever you wish, chocolate chips do really well in these as do nuts, cinnamon chips, white chocolate, and vanilla chips.

These are a good cookie to involve your kids in too as there is no need for a mixer and kids are always good to have around for rolling cookie dough. Just remember to kick the dog out of the kitchen - the cocoa powder is a major no-no and my dogs kept trying to sneak back in while I made these.  Be kinder than I was and put them outside where they (hopefully) won't be able to smell the heavenly aroma.


Wednesday, September 11, 2013

Accidental Whoopie Pies

While trying to develop the "perfect" chocolate brownie cookie, I accidentally whipped up my grandmother's old Whoopie Pie/Moon Pie recipe.  It wasn't planned as I haven't had her recipe in my hands since I was a Tween.  I was simply fiddling with a cookie recipe, and accidentally had these come out of the oven.

Maga (my grandmother) made hers with Carob powder, I made these with Cocoa powder, but either way works wonderfully.  My "tasting crew" at my favorite local diner all gave me thumbs up on these, so I figured it's worth posting here.  Pictures will come later.

The key to these is the way they are mixed, so read the instructions before you start pouring stuff into the bowl.

What you'll need for the cookies:

          1 cup butter, softened (nuked in the microwave works too)
          1 cup Cocoa powder (I prefer Nestle or Hershey's_
          1 1/2 cups granulated sugar
          2 eggs
          2 teaspoons vanilla
          2 1/4 cup all-purpose flour
          1 tsp. baking soda
          1/4 tsp. salt  (optional)
          Parchment paper
          Wax paper (just a little piece will do)

Preheat oven to 375 degrees Fahrenheit.

Cream the sugar and butter really well. Turn off the mixer, add in the Cocoa powder and mix on low/medium speed until really well mixed then increase the mixer speed. Add in the eggs and vanilla, mix until "fluffy" or well blended.  Add in the baking soda, flour and salt and mix well BY HAND, until all the flour is incorporated.

Roll into balls and place on a cookie sheet lined with parchment paper (non-stick may work too).  Place wax paper over the cookies and press flat using the bottom of a glass (if you don't have waxed paper, you can dip the glass in some cocoa powder to keep it from sticking).

Bake for 8 minutes, remove from the cookie sheet after a few minutes and let cool completely.


What you'll need for the icing:

          3 cups powdered sugar
          1/2 cup melted butter
          2 tsps. vanilla
          2-3 tablespoons milk

Place all of the ingredients in the mixing bowl. Start out slow, scrapping the sides until it is all incorporated, it will be thick at first. Add 1 tablespoon of milk, increase the mixer speed and continue mixing, continue adding milk until the icing is of the right consistency (thick but spreadable). When it looks "right" whip it for a few minutes more until it gets fluffy.

Place the icing in a frosting bag or baggie that you will cut the end off of and pipe the frosting onto a cookie bottom and top with another cookie. If the frosting is a bit loose, place the cookies in the freezer or fridge for a few minutes and it will firm up.  I would not suggest spreading the icing on as you would a cake, the cookies are a bit too fragile to hold up to that.

Serve with milk and don't worry about the calories!