There is a GREAT tutorial over on The Vintage Singer Sewing Machine Blog at http://vssmb.blogspot.com/
He's taken a lot of time to put together a really great in-depth tutorial on this. I'm very thankful for all of his work on this. It's greatly appreciated. The site is a wonderful resource for a variety of information on old Singer machines.
Showing posts with label vintage singer sewing machine. Show all posts
Showing posts with label vintage singer sewing machine. Show all posts
Thursday, December 29, 2011
Friday, November 25, 2011
Singer Model 99 Clean Up
I received this poor girl a few weeks ago. Her bentwood case was cracked and had pieces that were loose. Her motor was loose, due mainly to a too small belt. It looks as if someone had started a restoration on her without doing enough research and then simply gave up.
This is base all cleaned up.


This is base all cleaned up.

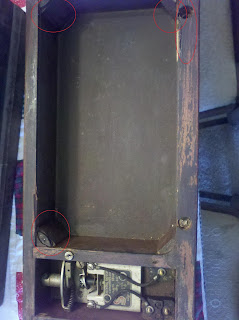
I had to glue back in 3 of the 4 corner pieces. The were rolling around loose in the case bottom when I got her. The top hinge was pulled up and nearly out of place due to the missing corner and some side wood pieces. Here they are all back in place. (Sorry, it's a bit hard to see the red circles.)

She was pretty filthy when I got her. Just look at the picture I bought her from.

And here she is, put back together, cleaned up and ready to find a new home. I used plain vinegar to soak her face plate and bobbin slide plate, along with a few screws, for a few minutes. They came out much shinier than they went in. I followed that up with a Carnuba wax refresh and quick bugg to bring some luster back. Too bad photos can't show it quite the same way it looks to the naked eye.

She's up for sale on my Etsy site for $55, plus shipping. I have her owner's certificate from Singer stating her date of manufacture of 1927 and a PDF version of the instruction manual.
Tuesday, November 22, 2011
Wood Glue is your Friend!
I just received another vintage Singer. (Yes, I'm in a full blown addiction here). I purchased her strictly for the case's locking hardware, and not the machine. When she arrived it's obvious why I got her so cheaply and why the didn't test her completely.
She's an old model, with the electrical components installed into the case and it's all original. I had planned on selling off the machine by itself. A JoAnn's employee has been looking for a decoration piece and I was thinking this one might be perfect for her. It may end up being usable as well.
I've been wood gluing, clamping, and piecing the poor case back together. Whoever had it didn't realize that the wooden pieces that were loose needed only to be glued back in place and are critical support pieces for the machine. As a result the hinges have pulled forward and one completely broke through the wood. This has been the toughest part of the piecing job. Shame on me, I forgot to take "before" pictures, so you'll only have "after pictures.
I'm hoping to have her polished up and placed back in case sometime tomorrow. For now I've named her Mustang Sally. Her decals are in near perfect condition and once she's cleaned and oiled she may still work. I won't try her out as her wiring is pretty rough, but she could be converted to a hand crank fairly easily for whoever owns her next.
I'm having fun working on these machines. Tomorrow it's adjust the tension on the Neechi day to do some polar fleece projects on. If it won't cooperate, then it's back to my Crinkle finish Model 15 for the heavy duty work.
Monday, November 7, 2011
New Toys!
I finally unloaded my latest vintage machine wins and got pictures of them. The Singer I purchased for the cabinet, not for the machine. Good news is the parts will work on my Grandmother's machine just fine, so I may have a replacement deck with perfect decals. I need to get a picture of the deck anyway, so a company I'm working with can make replacement decals.
Here's my $6 win:

As you can see, the varnish is having issues and a full strip, restain, varnish is in order. The machine itself has been recently used (based on it's new belt and nicely moving parts), so I had to gut it completely. Instead I think I'll simply swap what I need and either donate or sell this beastie cheap once I check it all out. Here's a better idea of the damage to the cabinet.


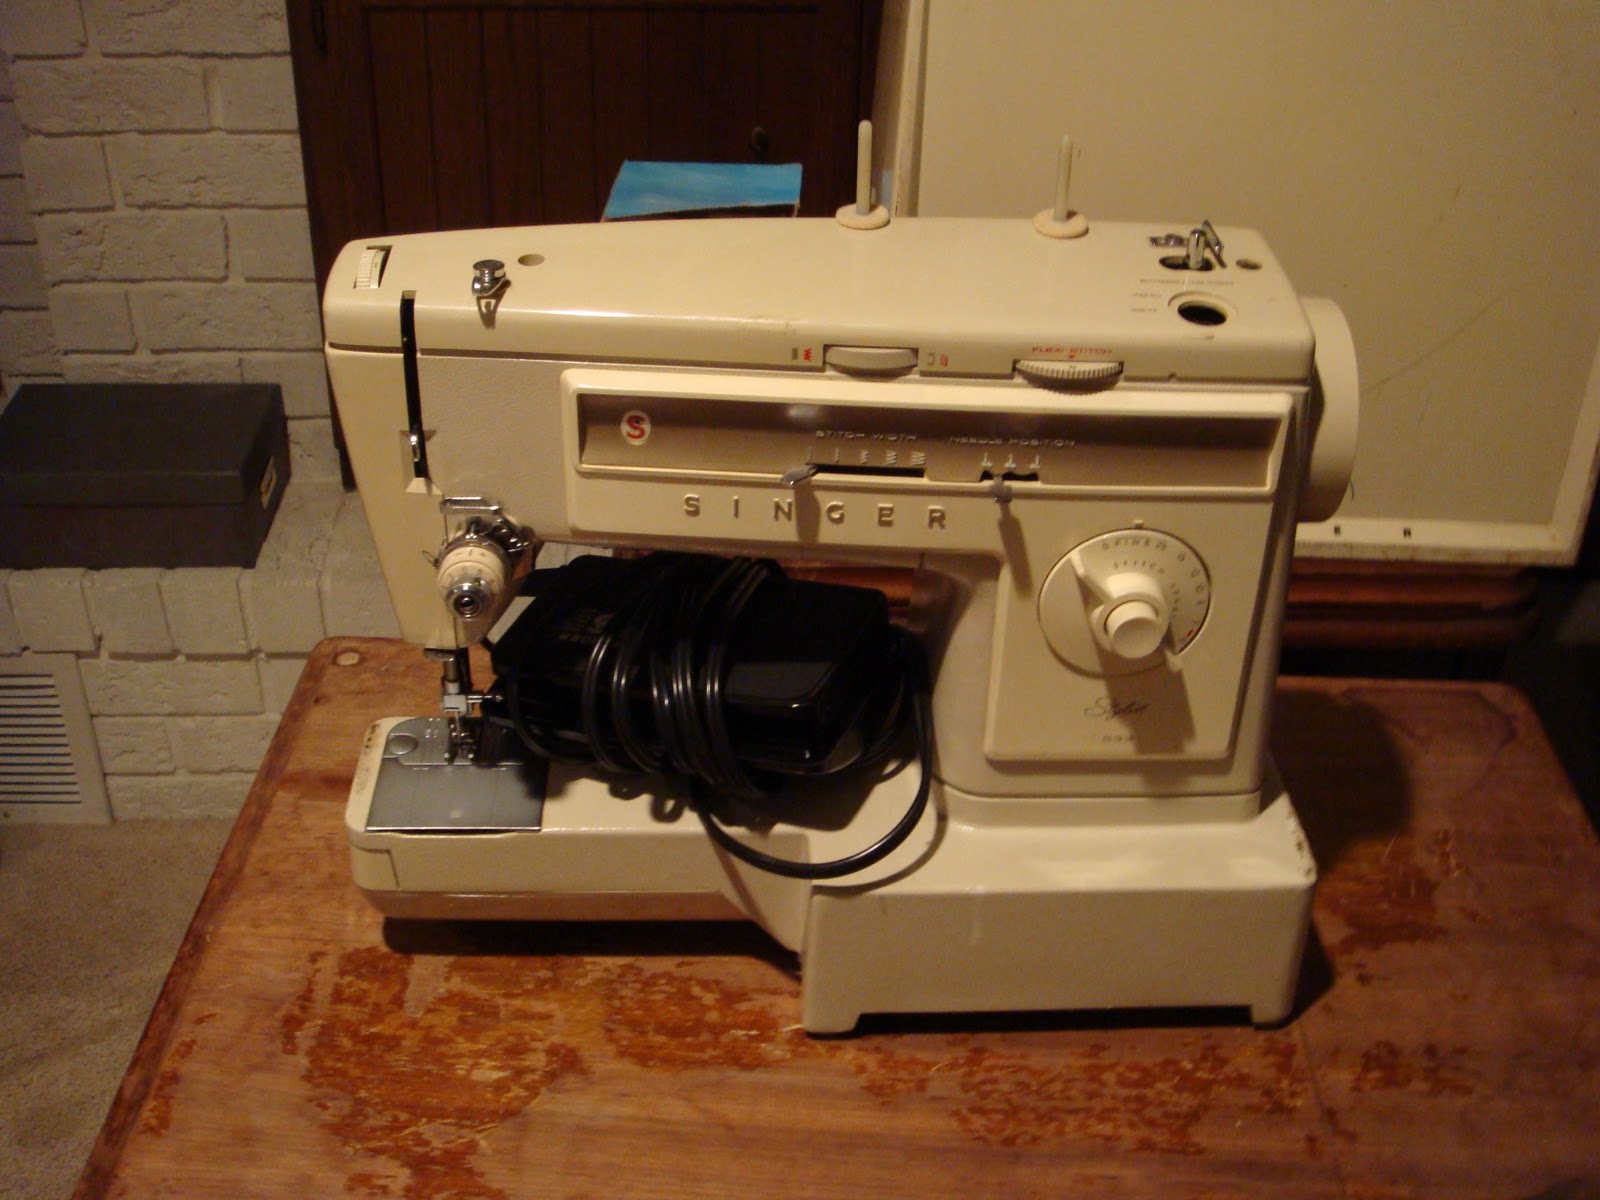
My other win is a Singer Stylist 533. After taking it out of the case I see there's a part missing. Still, not too bad for $8. And it does have the removable table stashed inside the case - right where it belongs. Wiring is in great shape, so now it's just time to clean it well and stitch up a small project.


Here's my $6 win:

As you can see, the varnish is having issues and a full strip, restain, varnish is in order. The machine itself has been recently used (based on it's new belt and nicely moving parts), so I had to gut it completely. Instead I think I'll simply swap what I need and either donate or sell this beastie cheap once I check it all out. Here's a better idea of the damage to the cabinet.


My other win is a Singer Stylist 533. After taking it out of the case I see there's a part missing. Still, not too bad for $8. And it does have the removable table stashed inside the case - right where it belongs. Wiring is in great shape, so now it's just time to clean it well and stitch up a small project.


Wednesday, November 2, 2011
Singer Sewing Machine Manuals ARE Free
I keep running across posts on different boards where folks are asking where to find a particular vintage sewing machine model's manual. For Kenmore owners it's a tough nut to crack and you may end up paying $10 or more to someone who's simply scanned in an original manual (marks, missing pages, and all), put it in a PDF and wants money in exchange for their time. Occasionally you'll find a seller who is offering the elusive original manual for sale/auction. Grab 'em when you can for those hard to find ones. And if you do score one, do the rest of us a favor if you scan it in and make the PDF available for free somewhere.
However, Singer owners - of all age machines - will happily find free PDF versions off of the Singer website. For those in the USA it's www.singerco.com. And if you can't find a version, email them, they'll get you a link or may even send you the PDF.
Here's the list of Singer Model PDFs I've downloaded for free so far:
15 and 15-91
66, 66K and 66-91
99 and 99K
101-1
201
301
Stylist 533
There are also parts manuals available for Singers, for free. I've downloaded those as well so that I can check part numbers should I need something.
My addiction is growing as I've just picked up the Stylist 533 today and will be checking out it's gears. (Apparently they're a bit prone to breakage). And I need to check inside the case to see if the table extension is hiding in there. Otherwise, this little beastie will be a free-arm machine for as long as I hang onto it. Pictures will follow soon!
Wednesday, September 28, 2011
It's a 101!
When I bid on this machine, I was blindly accepting Goodwill's assertion that it was a model 99. Nope, it's more rare than that, it's a Singer 101. I'm learning how hard it is to locate parts for this rare baby, so I'm not 100% certain that I'll restore it. I may part it out instead.
I purchased it for the case originally, but found the locks won't work on my other bentwood case. Still, it's a cool "toy" to play with and if nothing else, I'm keeping that cool, pull-chain light.

I purchased it for the case originally, but found the locks won't work on my other bentwood case. Still, it's a cool "toy" to play with and if nothing else, I'm keeping that cool, pull-chain light.

Monday, September 26, 2011
Cleaning Results - Vinegar
Black Betty has several plated pieces that need cleaning. As most everyone can find, there are recommendations for using a myriad of cleaning solutions, including vague references to a baking soda/lemon juice paste (I've yet to find a "recipe" for this). I've always had great results with vinegar on stuff around the house, so I chose to use the face plate as my test piece. Mainly because the damage to this and the bobbin cover is identical, so it'll be a nice comparison example.
This is what the face plate looked like before a 24-hour vinegar soak.


Notice the tape damage at the top of the arc in the picture above?
Here's what it looks like after, with a very light "scrubbing" using a soft bristle toothbrush prior to a rinsing with water.


This is what the face plate looked like before a 24-hour vinegar soak.


Notice the tape damage at the top of the arc in the picture above?
Here's what it looks like after, with a very light "scrubbing" using a soft bristle toothbrush prior to a rinsing with water.


The rust popped up within a day; if I was done, I would have oiled it and not just let it air dry. This still has a ways to go and it's getting another soak in vinegar to be followed up by a scrubbing and oiling. The surface feels nice and smooth, so I'll be okay if it doesn't get as shiny as new. I'm aiming for usable on this one, not perfection. I'm anxious to get more time to put in on her, but may have to wait until I have time off at Thanksgiving.
I'm working on a good recipe for the baking soda/lemon juice solution to use on the bobbin case cover. I'll let you know how that goes. The brass medallion will be cleaned using Wright's Brass Cleaner - I used this during my stint as a Disneyland Cast Member and have always been pleased with the results. I'll have pictures of the before and after on that as well.
Saturday, September 24, 2011
Singer used to have a nice PDF list of serial numbers to model numbers. It's disappeared from their site. I asked them about it and received this back:
You can research serial numbers via our website.It's kind of nice because you get this pretty certificate back, but I found the list much more useful. I wish I had downloaded all of the PDFs they had available when I thought of it.
Go to www.singerco.com. To the right of the SINGER 160th Anniversary emblem, click on “See More”, then go to “Learn About Your Vintage Sewing Machine”, and complete the data in each box. This will give you a Certificate with the year your machine was manufactured.
Monday, September 19, 2011
Canning Success and Vintage Machine Cleaning Tips
I've been learning to can from a friend of mine, which kind of takes time away from my vintage machine restoration projects. But it's been a worthwhile effort. Just this past weekend, I made my first attempt at Raspberry Preserves which came out very flavorful and yummy, and I canned up several different types of salsa. I now have a dozen jars of salsa, a dozen jars of pickles, 4 jars of whole tomatoes, and nearly a dozen jars of Strawberry Jam and Preserves. Here's a shot of the colorful concoctions (these went to work with me and were gone by the time lunch was over):

In addition to that, I put some Murphy's Oil Soap and elbow grease to good use and cleaned up the stains on the old Kenmore cabinet I picked up to put Black Betty in and am happy with the results. Not so happy with the pictures though, as the before ones are no good. I hope to post pictures of the cleaned up cabinet in a few more days, after a bit more elbow grease.
Well, I've been digging and digging and have yet to find any recommended "recipe" for the various cleaning methods I've seen out there, which I find annoying. So, for everyone else out there, I'm going to measure my combinations of vinegar, baking soda, lemon juice, and 409 and post them here with before and after shots of the results. Even if it only helps me, it'll be worth it.
Black Betty's buttonholer attachment has been found too, along with the manual. Here's what I've found so far, knowing that there is more somewhere in a box in my craft room. (I still have ones to open from our move 3 years ago).


This is the correct part number for the buttonhole attachment for a Singer 15-91. Others work as well, but this one was original to the machine. And I really like the "Made in U.S.A." mark.
In the next few days expect to see a few before and after pictures of a couple of plated pieces after being cleaned in vinegar or a baking soda/lemon juice mixture.
Saturday, September 10, 2011
Lots of help out there
I found a really good compilation of posts for cleaning vintage machines over at TreadleOn.net. They're not step-by-step instructions, but they're a good list of alternatives to use when cleaning the various parts of your vintage machines. I will be trying several of these techniques on Black Betty and will post my results. In the meantime, here's the link for you:
Cleaning Machines
There's also some mention on possible wood treatments for cabinets and cases, in case you're needing that as well.
Cleaning Machines
There's also some mention on possible wood treatments for cabinets and cases, in case you're needing that as well.
Wednesday, September 7, 2011
The "Black Betty" Project
My grandmother's old Singer was a much beloved machine in my childhood. She taught each of her grandkids to sew on it - including the boys. We started with puppets and moved onto bigger projects. It was also the only machine that could handle mending our horse's winter blanket and the old Boy Scout sleeping bags our other grandfather had picked up somewhere.
Originally mounted in a sewing cabinet, it had been removed years before I ever had my hands on it. My grandfather had planned on refinishing the cabinet (which I never recall having seen), but never got it done. We used to prop it up on a stack of Reader's Digests to use it as it didn't have a carrying case either.
Maga, a nickname given by my older sister, bravely fought the breast cancer that spread throughout her body for decades. She was a true survivor, but lost the battle with the last round in her late 70's. After her death, I received her beloved Singer. It had been neglected and stuffed in a garage for years, just off the Pacific Coast, prior to coming into my possession. The cabinet was long gone by then, and my doll that she had made for me when I was three (it's the same height and size as I was at the time) that she'd been planning on repairing for me was found in a water soaked box, with mildew damage to one leg. I was happy to get them both, no matter what the condition.
Nearly 3 decades and many moves later, I finally can finish the job my grandfather started. First, I found, bid on, and won another classic Singer 15 (I didn't know the model when I bid on it) in the much sought after, bent wood case. I'd originally planned on putting Black Beauty in the case, but then I won a bid on a vintage Kenmore that I'd felt sorry for and bid on simply for the cabinet. The first winner cost me a whooping $31 and provided me with another Singer 15 with the crinkle finish, the second cost me a horrid $6 (yep, that cheap!) for a cabinet badly in need of refinishing or paint and a beautiful 1947 Kenmore of unknown function.
The challenge was to find Black Betty - I thought for sure I'd put her in my craft room, but she was nowhere to be found. Nearly a week later, and after searching almost 3,000 sq. ft. twice, I found her on a shelf, behind the old Model T trunk in - alas - the garage. That would have been acceptable if I still lived in dry, sunny Riverside county, but nope, I'm in the rust-belt of the MidWest now.
Here's how Black Betty looked after a dry cloth dusting and quick surface vacuuming:


I did a lot of searching online for tips on cleaning and restoring vintage Singer machines and found several suggestions, many using really caustic chemicals. Maga would have been concerned about the toxins, so I couldn't imagine using something like Kerosene on those delicate decals. I chose the more "delicate" option of using a few drops of Ivory Dishwashing Liquid (don't all stitchers have a bottle around?) in a cup of warm water.
Here's what I did:
Did I mention I have no patience? I started working larger and larger areas, finding that the cotton balls worked well on the main deck, and after about 15 minutes of this I was seeing progress (and noticed the paint chips).
Here's what Black Betty looked like after 15 minutes:


I couldn't see any of these decals when I started. I was thrilled to see this much of them as I need to make a pattern in case I need to repaint these. Singer decals, as I've discovered, are more rare than the Siberian Tiger. I've emailed Singer to ask that they either 1) make stencils available that we can buy, or 2) make the decals available for purchase again...you'd think they'd do it, since they could print them as needed.
Encouraged, and a bit nervous, I decided to remove the once gorgeous face plate and see what kind of rust damage may be facing me below the surface. I was happy to see that it wasn't bad at all, and surprised to find what appears to be a nest of some type. I'm not sure what as our mice are WAY too big to fit into a Singer.


Did you see the "mini-nest" sitting just above the needle? I just need to find the right cleaning solution for the face plate to bring it back to it's former glory. My camera makes it look rustier than it is, but it helps me see how much cleaning it really needs. I also need to locate a few manuals for it, the service manual would be the most helpful, but I'll take whatever I can find.
Now, if that Yahoo Group for Vintage Singer owners would just hurry up and approve me!
Originally mounted in a sewing cabinet, it had been removed years before I ever had my hands on it. My grandfather had planned on refinishing the cabinet (which I never recall having seen), but never got it done. We used to prop it up on a stack of Reader's Digests to use it as it didn't have a carrying case either.
Maga, a nickname given by my older sister, bravely fought the breast cancer that spread throughout her body for decades. She was a true survivor, but lost the battle with the last round in her late 70's. After her death, I received her beloved Singer. It had been neglected and stuffed in a garage for years, just off the Pacific Coast, prior to coming into my possession. The cabinet was long gone by then, and my doll that she had made for me when I was three (it's the same height and size as I was at the time) that she'd been planning on repairing for me was found in a water soaked box, with mildew damage to one leg. I was happy to get them both, no matter what the condition.
Nearly 3 decades and many moves later, I finally can finish the job my grandfather started. First, I found, bid on, and won another classic Singer 15 (I didn't know the model when I bid on it) in the much sought after, bent wood case. I'd originally planned on putting Black Beauty in the case, but then I won a bid on a vintage Kenmore that I'd felt sorry for and bid on simply for the cabinet. The first winner cost me a whooping $31 and provided me with another Singer 15 with the crinkle finish, the second cost me a horrid $6 (yep, that cheap!) for a cabinet badly in need of refinishing or paint and a beautiful 1947 Kenmore of unknown function.
The challenge was to find Black Betty - I thought for sure I'd put her in my craft room, but she was nowhere to be found. Nearly a week later, and after searching almost 3,000 sq. ft. twice, I found her on a shelf, behind the old Model T trunk in - alas - the garage. That would have been acceptable if I still lived in dry, sunny Riverside county, but nope, I'm in the rust-belt of the MidWest now.
Here's how Black Betty looked after a dry cloth dusting and quick surface vacuuming:


I did a lot of searching online for tips on cleaning and restoring vintage Singer machines and found several suggestions, many using really caustic chemicals. Maga would have been concerned about the toxins, so I couldn't imagine using something like Kerosene on those delicate decals. I chose the more "delicate" option of using a few drops of Ivory Dishwashing Liquid (don't all stitchers have a bottle around?) in a cup of warm water.
Here's what I did:
- Started with Q-tips, dipped in the warm water solution
- Worked in a counter-clockwise circle, gently rubbing while turning the Q-tip
- Patted dry with a dry, cotton washcloth - don't rub, pat!
- For larger areas, I switched to cotton balls, dipped in the water solution and squeezed nearly dry
Did I mention I have no patience? I started working larger and larger areas, finding that the cotton balls worked well on the main deck, and after about 15 minutes of this I was seeing progress (and noticed the paint chips).
Here's what Black Betty looked like after 15 minutes:


I couldn't see any of these decals when I started. I was thrilled to see this much of them as I need to make a pattern in case I need to repaint these. Singer decals, as I've discovered, are more rare than the Siberian Tiger. I've emailed Singer to ask that they either 1) make stencils available that we can buy, or 2) make the decals available for purchase again...you'd think they'd do it, since they could print them as needed.
Encouraged, and a bit nervous, I decided to remove the once gorgeous face plate and see what kind of rust damage may be facing me below the surface. I was happy to see that it wasn't bad at all, and surprised to find what appears to be a nest of some type. I'm not sure what as our mice are WAY too big to fit into a Singer.


Did you see the "mini-nest" sitting just above the needle? I just need to find the right cleaning solution for the face plate to bring it back to it's former glory. My camera makes it look rustier than it is, but it helps me see how much cleaning it really needs. I also need to locate a few manuals for it, the service manual would be the most helpful, but I'll take whatever I can find.
Now, if that Yahoo Group for Vintage Singer owners would just hurry up and approve me!
Subscribe to:
Posts (Atom)